
Capturing Swiss Alps Pictures With Lukas Griffin

For some time, I’ve wanted to share my experience of shooting in the wintery mountains of Switzerland. I had the pleasure of visiting the Swiss Alps a couple of years ago, with the intention of capturing the interaction between humans and this beautifully vast landscape in all its glory.
The Swiss Alps pose a challenge and surround themselves with many questions from a photographer standpoint. Before I ventured out onto my expedition, sufficient research was carried out before I ventured into such a unique environment.
I had many questions before I left for my trip and now having experienced what it is like to shoot in the Swiss Alps for myself, I would like to share what I learnt with you along the way. If you yourself are a photographer planning a trip to the Swiss Alps, this article may just be one that you’re going to want to refer to when capturing Swiss Alps pictures of your very own.
Shooting In The Swiss Alps - In the winter, a snow-filled landscape changes everything. A white blanket can create a very interesting visual element to your Swiss Alps pictures. Cracks, oddly shaped structures, icicles and patterns on the landscape are just some of the variables can evolve into what I’d class as ‘visually interesting’ for the camera’s eye.
When I shoot, I personally like to focus on the whole scene. For example, in the Swiss Alps, I adore the way that the snow covers the mountains and the trees, the touch of winter goes as far as the eye can see, surrounded by frozen lakes, rivers and waterfalls, cloaked with whitened mist.
These subjects may seem rather obvious to the eye and so they are, but my angle of imagery focuses on the interaction between subject and surrounding. So, where some photographers may prefer to find hidden corners, moments in time are what my photography represents.
I look for the moments that show lives being lived. To live these moments truly, is what takes my breath away. To create astonishing minimalist prints of your own, feel free to follow my guide below:
Composition - When I’m getting ready to capture a shot, I like to start off by analyzing the scene and decide which element(s) should take priority. Perhaps the form of a mountain or shape of a tree may depict the setting for my image, but the feeling is what I wait for before the shot is taken.
Over time, I’ve learnt not to think too much about what I am shooting. When I feel the image, that’s when I just let go with my camera. Some of my most favorite works have been created this way.
Of course, when you’re just starting out, there are things that you just sort of pay attention to, but with time and experience, I think your brain just starts to analyze things automatically without you having to consciously weigh everything up and break everything down. Knowledge is key and in photography, it is important to learn the ways of your camera and how it perceives a setting.
Once I’ve taken the time analyze my scene, leading lines are what I look for next. Once I know what I intend to highlight, I look for elements in the landscape that would lead the eye to this specific element. For example, cracks in the snow leading to a tree or rock patterns leading to a mountain or frozen water lining the bottom of my image.
Layers on the other hand are what I use to convey depth into my images. This tends to work very well with water-based images, but as snow can make a setting look rather two-dimensional, this is one of the challenges of shooting a winter scene. However, there are some things that you can do to bring more to the setting.
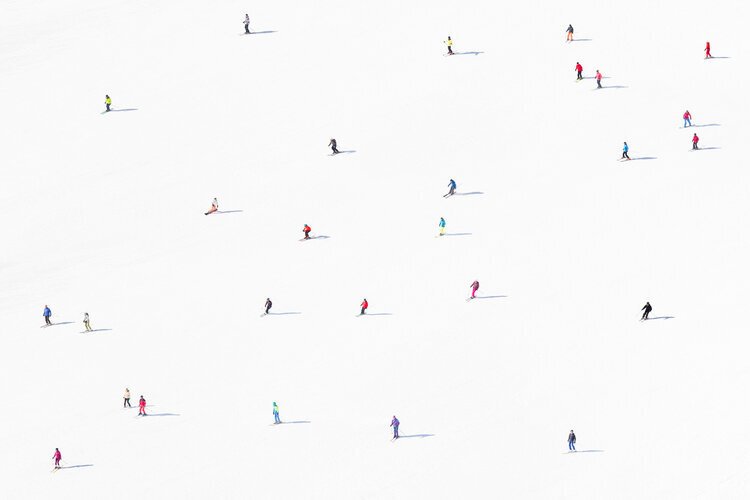
I’d recommend utilizing the objects in the foreground, the center and the back of an area to line a shot. In the image below, I had very little in terms of actual contrast in the landscape to work with.
So, what did I do? I took the opportunity to capture the masses of skiers sliding down the slopes, which makes for a rather interesting addition to my collection of minimalist prints. In some shots however, you should also turn your attention to the sky. The inclusion of a horizon or sunset could add a very nice additional layer to your image.
Similarly, to layering, conveying the size of your environment would include shooting smaller elements against the backdrop of vaster landscapes. This can be achieved when analyzing the subjects of your scene.
Reflections can be another nice addition to any image, but this could work exceptionally well in a wintery scene. Perhaps the reflection bouncing off of a frozen lake or from a form of ice could become a subject in its own right within your collection of Swiss Alps pictures.
Exposure - If you meter your camera’s exposure for snow it will expose a little grey, as the meter attempts to expose for mid-tones. So, in order to ensure the whites are white and not grey, I often have to slightly overexpose to compensate and it is for that reason that I tend to ETTR (expose to the right), and use the histogram to make sure I don’t clip any values.
This is largely because there can be very light and very dark tones present when capturing snowy scenes. So, this will be very useful for you to remember when you’re shooting in the Swiss Alps.
Lighting - The best time of day for winter landscapes is during the golden hours (sunrise and sunset), as you will begin to experience very strong shadows if you attempt snow photos in the middle of the day.
However, it is not always possible to be in some locations by sunrise and after sunset. I usually hike to get to some nice spots and this requires leaving very early in the morning or hiking down at night, but some locations are too dangerous to hike during those hours so, you’ll have to research your route and access allowances before setting off on your venture.
The golden hours bring amazing warmth to the landscape, and the right light can make it look as though it’s being illuminated by fire. The clean, crisp air of the morning blue hour also has something special to a snowy that I really love.
The stillness and quiet makes everything look so pure, fresh and picturesquely beautiful and I can guarantee that you will have many opportunities to capture breathtaking Swiss Alps pictures in this location.
Gear - Lenses are of course a very important factor to consider on any shoot, but where the Swiss Alps are concerned, I would recommend shooting with a variety of lenses. A wide angel lens allows for you to include as much landscape as possible whilst taking the photo close up to your chosen subject(s).
On the other hand, a telephoto lens will allow you to zoom into a specific element. A macro lens will serve you well if you wish to make the most of the really fine and interesting detail that often presents itself in these landscapes.
A tripod is something which I should mention, however that being said I don’t always take one! My lenses are heavy, and I am often carrying them for many hours, so I’ll sometimes leave my tripod at home. However, it’s essential for shooting during the golden hours when you’ll need to use slow shutter speeds. But for all other times of the day, I can get away with leaving it behind and this would be true when capturing Swiss Alps Pictures.
Element Protection - You can experience freezing temperatures in the Swiss Alps so there will be measures that you should take to protect both your gear and yourself from the elements.
Lens Condensation can form in your lens when you expose it to dramatic temperature changes. Over time, this can damage the internal workings of your gear.
To avoid this, introduce your gear to the climatic changes gradually, both when heading out and when you return. The simple way to do this is to keep all your gear in your camera bag and ensure the bag is completely closed. Don’t head out with your camera strapped to your body, exposed to the elements! Take it out only when you arrive and you’re ready to take your first shots.
Once you finish shooting, store it back in your bag, properly enclosed. Leave it stored in your bag once you return to warmer temperatures, until it’s had a chance to adjust to the dramatic climate change. Protect your gear from rain, snow and mist by using a lens hood. In heavy rain or snow, I put my gear away and wait it out.
For more information on this destination, please visit myswissalps.com.
So, that concludes my guide to capturing Swiss Alps pictures. I hope that you have found this article both intriguing and useful from a photography standpoint.
On the other hand, if you’re an art curator, looking to expand the collection of minimalist prints in your home, you can view the artworks featured within this article you can view my collection of Swiss Alps pictures here.
If you’d like to keep up to date, feel free to visit my Instagram page @lukasgriffin for further examples of my photography work.
PHOTO CREDITS
All photos used within this article are courtesy of Lukas Griffin.
All images are available to purchase as prints, view all collections.